


使用 Nginx 部署反向代理并使用模块自动配置和续期 SSL (Certbot)
357
2026-01-05
安装 Nginx,配置反向代理,并使用 Certbot 自动化部署 Let's Encrypt 证书
我使用的是debian13
1. 安装 Nginx
首先更新软件包列表并安装 Nginx。
apt update && apt install nginx验证模块支持: Debian 官方仓库的 Nginx 默认编译了 SSL 模块。可以通过以下命令确认:
nginx -V 2>&1 | grep --color -o with-http_ssl_module执行结果如下
root# nginx -V 2>&1 | grep --color -o with-http_ssl_module
with-http_ssl_module
2. 安装 Certbot
apt install certbot python3-certbot-nginx -y3. 配置 Nginx 反向代理
在申请 SSL 证书之前,先创建一个基础的 HTTP 配置文件。
sudo vim /etc/nginx/conf.d/test.ceshi.com.conf
server {
    listen 80;
    server_name test.ceshi.com;

    client_max_body_size 1024m;

    location / {
        proxy_pass http://127.0.0.1:5000;

        # 传递真实的客户端 IP 和 协议
        proxy_set_header Host $host;
        proxy_set_header X-Real-IP $remote_addr;
        proxy_set_header X-Forwarded-For $proxy_add_x_forwarded_for;
        proxy_set_header X-Forwarded-Proto $scheme;

        # 支持 WebSocket (可选,对某些现代 Web 应用很重要)
        proxy_http_version 1.1;
        proxy_set_header Upgrade $http_upgrade;
        proxy_set_header Connection "upgrade";
    }
}
检查配置并重启服务:
nginx -t
systemctl restart nginx
此时请确保域名
test.ceshi.com已解析到服务器 IP,且 80 端口已开放。
4. 自动申请 SSL 证书
使用 Certbot 的 Nginx 插件,它会自动验证域名、获取证书并修改 Nginx 配置。
certbot --nginx -d test.ceshi.com5. 最终配置解析
执行完 Certbot 后,配置文件 /etc/nginx/conf.d/test.ceshi.com.conf 会被自动修改。其核心逻辑如下:
HTTPS (443) 模块: Certbot 自动插入了
ssl_certificate相关路径和安全参数。HTTP 重定向: 增加了一个专门处理 80 端口的
server块,将所有请求通过 301 状态码强制跳转至 HTTPS,确保通信安全。
6. 维护与自动续期
Let's Encrypt 证书有效期为 90 天。Debian 13 在安装 certbot 后会自动创建定时任务。
检查续期服务是否正常:
systemctl status certbot.timer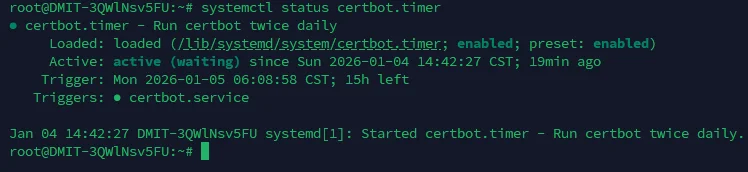
测试手动续期(模拟):
certbot renew --dry-run