


SpringBoot自动装配原理探索
环境
JDK 17
Springboot 2.7
在了解Spring boot自动装配原理之前,需要了解两个很重要的知识点Java SPI机制和Spring的Import注解,把这两个重要的点理解清楚之后就很容易理解Spring boot的自动装配原理了,并且能很好的应用到实际项目中。
JDK实现
SPI ,全称为 Service Provider Interface(服务提供者接口),是一种服务发现机制。它通过在classpath路径下的META-INF/services文件夹查找文件,自动加载文件中所定义的类。
自己编码实现
1.新建一个接口类Anima
package com.wxy97.springbootstudy.demo;

public interface Anima {
    void call();
}
2.新建一个Cat类实现Anima接口
SPI的实现类必须携带一个无参构造方法
package com.wxy97.springbootstudy.demo;

/**
 * @author wxy
 * @email wxy@wxy97.com
 * @createTime 2022年06月15日 08:49:00
 */
public class Cat implements Anima {
    @Override
    public void call() {
        System.out.println("喵喵喵");
    }
}
3.新建一个Dog类实现Anima接口
package com.wxy97.springbootstudy.demo;

/**
 * @author wxy
 * @email wxy@wxy97.com
 * @createTime 2022年06月15日 08:49:00
 */
public class Dog implements Anima {
    @Override
    public void call() {
        System.out.println("汪汪汪");
    }
}
4.写配置文件实现自动装配
classpath下新建META-INF/services文件夹
创建文件com.wxy97.springbootstudy.demo.Anima
接口的全限定类名就是文件名
编辑文件,写入两个实现类全路径
com.wxy97.springbootstudy.demo.Cat
com.wxy97.springbootstudy.demo.Dog
5.Main方法测试
package com.wxy97.springbootstudy.demo;

import java.util.ServiceLoader;

/**
 * @author wxy
 * @email wxy@wxy97.com
 * @createTime 2022年06月15日 08:51:00
 */
public class Main {
    public static void main(String[] args) {
        ServiceLoader<Anima> load = ServiceLoader.load(Anima.class);
        load.forEach(anima -> {
            anima.call();
        }); // 打印出汪汪汪和喵喵喵
    }
}
ServiceLoader探索
通过该过程可以了解到SPI是面向接口编程,不关注接口的具体实现,由配置文件配置具体要实例化的厂商接口。JDK也提供了具体的实现,我们一起来看看ServiceLoader是如何实现的,通过load方法跟入JDK源码(以下只列出核心代码)。
打开ServiceLoader类
load方法
    @CallerSensitive
    public static <S> ServiceLoader<S> load(Class<S> service) {
        ClassLoader cl = Thread.currentThread().getContextClassLoader();
        return new ServiceLoader<>(Reflection.getCallerClass(), service, cl);
    }
@CallerSensitive
当检查权限时``Reflection.getCallerClass()会跳过ServiceLoader类,直接获取原始调用者的对象,进行权限判断。 比如线程1--->反射1--->反射2,当反射2检查权限时,会检查到反射1,而不是真正的线程1的调用权限。这个是解决黑客利用双反射来绕过权限,获得资源。所以后面JVM对标注@CallerSensitive`的类会跳过,来到没有这个注解类的位置,来获取真正的权限。Thread.currentThread().getContextClassLoader
没有loader传入,就会返回线程的ContextClassLoader,每当创建一个线程时,就会继承父线程classLoader,创建一个ContextClassLoader,需要被显示的调用,否则永远不会被使用。main线程的getContextClassLoader就是SystemClassloader
找到hasNextService方法
 @SuppressWarnings("unchecked")
        private boolean hasNextService() {
            while (nextProvider == null && nextError == null) {
                try {
                    Class<?> clazz = nextProviderClass();
                    if (clazz == null)
                        return false;

                    if (clazz.getModule().isNamed()) {
                        // ignore class if in named module
                        continue;
                    }

                    if (service.isAssignableFrom(clazz)) {
                        Class<? extends S> type = (Class<? extends S>) clazz;
                        Constructor<? extends S> ctor
                            = (Constructor<? extends S>)getConstructor(clazz);
                        ProviderImpl<S> p = new ProviderImpl<S>(service, type, ctor, acc);
                        nextProvider = (ProviderImpl<T>) p;
                    } else {
                        fail(service, clazz.getName() + " not a subtype");
                    }
                } catch (ServiceConfigurationError e) {
                    nextError = e;
                }
            }
            return true;
        }
可以看出调用了
nextProviderClass这个方法 从方法名大概可以看出是 找到下一个提供者
找到nextProviderClass这个方法
        /**
         * Loads and returns the next provider class.
         */
        private Class<?> nextProviderClass() {
            if (configs == null) {
                try {
                    String fullName = PREFIX + service.getName();
                    if (loader == null) {
                        configs = ClassLoader.getSystemResources(fullName);
                    } else if (loader == ClassLoaders.platformClassLoader()) {
                        // The platform classloader doesn't have a class path,
                        // but the boot loader might.
                        if (BootLoader.hasClassPath()) {
                            configs = BootLoader.findResources(fullName);
                        } else {
                            configs = Collections.emptyEnumeration();
                        }
                    } else {
                        configs = loader.getResources(fullName);
                    }
                } catch (IOException x) {
                    fail(service, "Error locating configuration files", x);
                }
            }
            while ((pending == null) || !pending.hasNext()) {
                if (!configs.hasMoreElements()) {
                    return null;
                }
                pending = parse(configs.nextElement());
            }
            String cn = pending.next();
            try {
                return Class.forName(cn, false, loader);
            } catch (ClassNotFoundException x) {
                fail(service, "Provider " + cn + " not found");
                return null;
            }
        }
看到方法头部注释:加载并返回下一个提供者类
String fullName = PREFIX + service.getName();
configs = ClassLoader.getSystemResources(fullName);
加载资源文件 路径前缀是
static final String PREFIX = "META-INF/services/";
Set<String> providerNames = new HashSet<>(); // 避免服务提供者重复
不足:
不能按需加载,需要遍历配置文件中所有的实现并实例化。
不能很直接的获取某个实例化对象,只能通过迭代的形式获取。
Spring中的@Import
在Spring中类似于@Component,@Bean,@EnableXxxxx 这样的注解肯定见过吧,
比如:EnableAsync开启异步,EnableTransactionManagement开启事务
点击去发现里面是Import注解
@Target({ElementType.TYPE})
@Retention(RetentionPolicy.RUNTIME)
@Documented
@Import({AsyncConfigurationSelector.class})
public @interface EnableAsync {
    Class<? extends Annotation> annotation() default Annotation.class;

    boolean proxyTargetClass() default false;

    AdviceMode mode() default AdviceMode.PROXY;

    int order() default Integer.MAX_VALUE;
}
Import注解的3种使用方式
1.普通的组件
新建一个类Car
package com.wxy97.springbootstudy.demoImport;

/**
 * @author wxy
 * @email wxy@wxy97.com
 * @createTime 2022年06月15日 09:50:00
 */
public class Car {
    public Car() {
        System.out.println("Car is Init");
    }
}
新建一个类CarMainConf
package com.wxy97.springbootstudy.demoImport;

import org.springframework.context.annotation.Configuration;
import org.springframework.context.annotation.Import;

/**
 * @author wxy
 * @email wxy@wxy97.com
 * @createTime 2022年06月15日 09:51:00
 */
@Import(Car.class)
@Configuration
public class CarMainConf {

}
启动项目 打印 “Car is Init”
2.实现ImportSelector接口
新建类Boy
package com.wxy97.springbootstudy.demoImport;

/**
 * @author wxy
 * @email wxy@wxy97.com
 * @createTime 2022年06月15日 09:55:00
 */
public class Boy {
    public Boy() {
        System.out.println("boy is Init");
    }
}
新建类MyImport实现ImportSelector 接口 重新方法selectImports
package com.wxy97.springbootstudy.demoImport;

import org.springframework.context.annotation.ImportSelector;
import org.springframework.core.type.AnnotationMetadata;

/**
 * @author wxy
 * @email wxy@wxy97.com
 * @createTime 2022年06月15日 09:56:00
 */
public class MyImport implements ImportSelector {
    @Override
    public String[] selectImports(AnnotationMetadata importingClassMetadata) {
        return new String[]{"com.wxy97.springbootstudy.demoImport.Boy"};
    }
}
新建类BoyMainConf
package com.wxy97.springbootstudy.demoImport;

import org.springframework.context.annotation.Configuration;
import org.springframework.context.annotation.Import;

/**
 * @author wxy
 * @email wxy@wxy97.com
 * @createTime 2022年06月15日 09:57:00
 */
@Import(MyImport.class)
@Configuration
public class BoyMainConf {
}
启动项目 打印 “boy is Init”
这种方式往Spring中注入的是一个ImportSelector,当Spring扫描到
MyImport,将会调用selectImports方法,将selectImports中返回的String数组中的类注入到容器中。
3.实现ImportBeanDefinitionRegistrar接口
新建类Girl
package com.wxy97.springbootstudy.demoImport;

/**
 * @author wxy
 * @email wxy@wxy97.com
 * @createTime 2022年06月15日 10:00:00
 */
public class Girl {
    public Girl() {
        System.out.println("girl is Init");
    }
}
新建类MyImportBeanDefinitionRegistrar 实现MyImportBeanDefinitionRegistrar接口得registerBeanDefinitions方法
package com.wxy97.springbootstudy.demoImport;

import org.springframework.beans.factory.config.BeanDefinition;
import org.springframework.beans.factory.support.BeanDefinitionRegistry;
import org.springframework.beans.factory.support.RootBeanDefinition;
import org.springframework.context.annotation.ImportBeanDefinitionRegistrar;
import org.springframework.core.type.AnnotationMetadata;

/**
 * @author wxy
 * @email wxy@wxy97.com
 * @createTime 2022年06月15日 10:01:00
 */
public class MyImportBeanDefinitionRegistrar implements ImportBeanDefinitionRegistrar {
    @Override
    public void registerBeanDefinitions(AnnotationMetadata importingClassMetadata, BeanDefinitionRegistry registry) {
        BeanDefinition beanDefinition = new RootBeanDefinition(Girl.class);
        registry.registerBeanDefinition("my-girl", beanDefinition);
    }
}
新建类GirlMainConf
package com.wxy97.springbootstudy.demoImport;

import org.springframework.context.annotation.Configuration;
import org.springframework.context.annotation.Import;

/**
 * @author wxy
 * @email wxy@wxy97.com
 * @createTime 2022年06月15日 10:02:00
 */
@Import(MyImportBeanDefinitionRegistrar.class)
@Configuration
public class GirlMainConf {
}
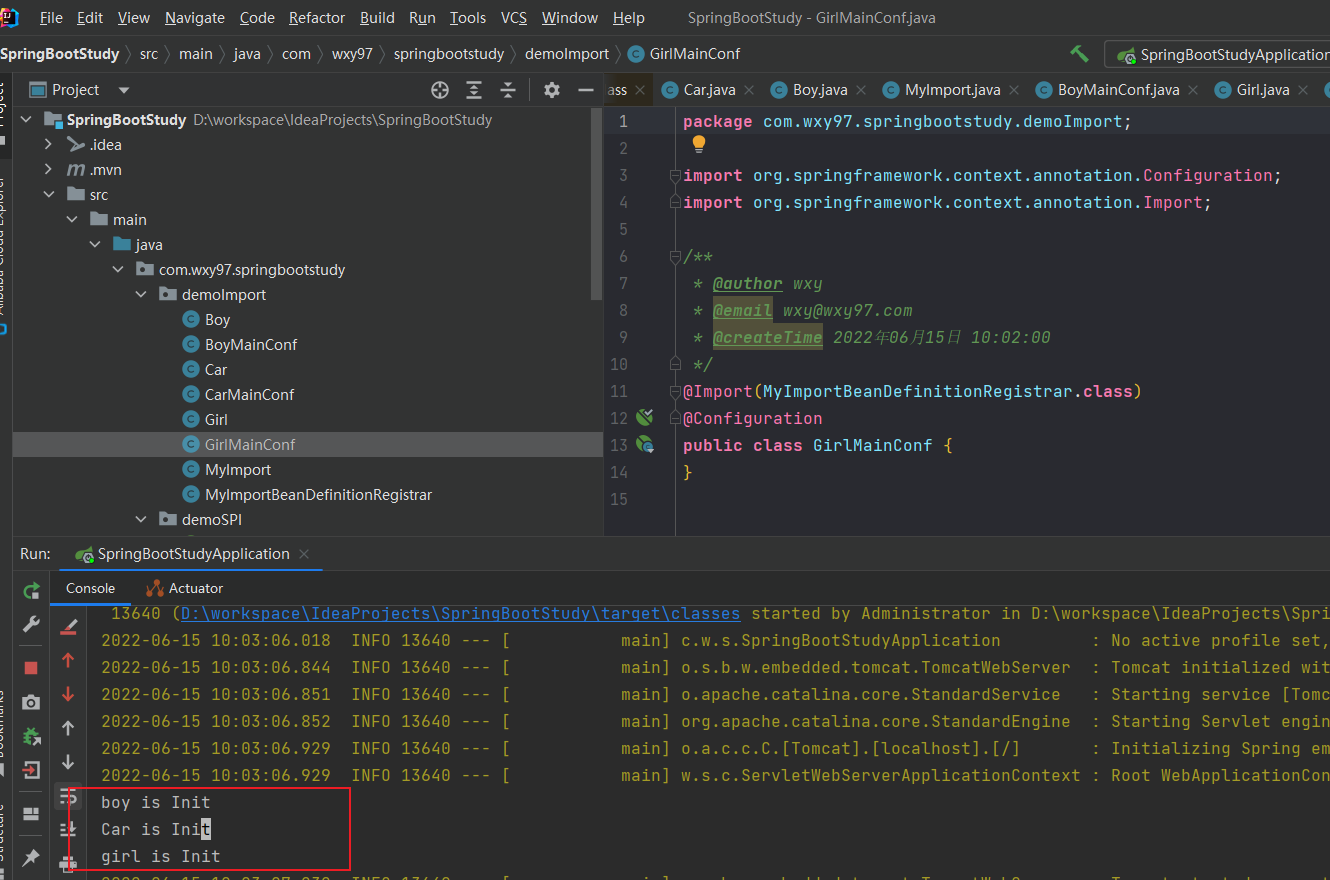
启动项目打印"girl is Init"
类似于第二种,当Spring扫描到该类时,将会调用
registerBeanDefinitions方法,在该方法中,我们手动往Spring中注入了一个Baby的Bean,理论上可以通过这种方式不限量的注入任何的Bean
SpringBoot自动装配原理
我们在使用SpringBoot项目时,用到的唯一的注解就是@SpringBootApplication,所以我们唯一能下手的也只有它了,打开它看看吧。
@Target({ElementType.TYPE})
@Retention(RetentionPolicy.RUNTIME)
@Documented
@Inherited
@SpringBootConfiguration
@EnableAutoConfiguration
@ComponentScan(
    excludeFilters = {@Filter(
    type = FilterType.CUSTOM,
    classes = {TypeExcludeFilter.class}
), @Filter(
    type = FilterType.CUSTOM,
    classes = {AutoConfigurationExcludeFilter.class}
)}
)
public @interface SpringBootApplication {
这个注解上边包含的东西还是比较多的,咱们先看一下两个简单的热热身@ComponentScan 注解
这个注解会默认扫描声明类所在的包开始扫描,例如:
类com.wxy97.springbootstudy.SpringBootStudyApplication类上标注了@ComponentScan 注解,则com.wxy97.springbootstudy.*的包下的类都可以被扫描到
这个注解一共包含以下几个属性:
basePackages:指定多个包名进行扫描
basePackageClasses:对指定的类和接口所属的包进行扫
excludeFilters:指定不扫描的过滤器
includeFilters:指定扫描的过滤器
lazyInit:是否对注册扫描的bean设置为懒加载
nameGenerator:为扫描到的bean自动命名
resourcePattern:控制可用于扫描的类文件
scopedProxy:指定代理是否应该被扫描
scopeResolver:指定扫描bean的范围
useDefaultFilters:是否开启对@Component,@Repository,@Service,@Controller的类进行检测
@SpringBootConfiguration注解
这个注解更简单了,它只是对Configuration注解的一个封装而已
@Target({ElementType.TYPE})
@Retention(RetentionPolicy.RUNTIME)
@Documented
@Configuration
public @interface SpringBootConfiguration {
}
EnableAutoConfiguration注解
这个注解可是重头戏了,SpringBoot号称的约定大于配置,也就是本文的重点自动装配的原理就在这里了
@Target({ElementType.TYPE})
@Retention(RetentionPolicy.RUNTIME)
@Documented
@Inherited
@AutoConfigurationPackage
@Import({AutoConfigurationImportSelector.class})
public @interface EnableAutoConfiguration {
    String ENABLED_OVERRIDE_PROPERTY = "spring.boot.enableautoconfiguration";

    Class<?>[] exclude() default {};

    String[] excludeName() default {};
}
EnableAutoConfiguration本质上也是通过Import完成的,并且Import了一个Selector
看一看里面的代码逻辑吧
selectImports
    public String[] selectImports(AnnotationMetadata annotationMetadata) {
        if (!this.isEnabled(annotationMetadata)) {
            return NO_IMPORTS;
        } else {
            AutoConfigurationEntry autoConfigurationEntry = this.getAutoConfigurationEntry(annotationMetadata);
            return StringUtils.toStringArray(autoConfigurationEntry.getConfigurations());
        }
    }
getAutoConfigurationEntry
    protected AutoConfigurationEntry getAutoConfigurationEntry(AnnotationMetadata annotationMetadata) {
        if (!this.isEnabled(annotationMetadata)) {
            return EMPTY_ENTRY;
        } else {
            AnnotationAttributes attributes = this.getAttributes(annotationMetadata);
            // 获取候选的配置类
            List<String> configurations = this.getCandidateConfigurations(annotationMetadata, attributes);
            // 移除重复的配置
            configurations = this.removeDuplicates(configurations);
            // 获取到要排除的配置
            Set<String> exclusions = this.getExclusions(annotationMetadata, attributes);
            this.checkExcludedClasses(configurations, exclusions);
            // 移除所有要排除的配置
            configurations.removeAll(exclusions);
            // 过滤掉不具备注入条件的配置类,通过Conditional注解
            configurations = this.getConfigurationClassFilter().filter(configurations);
            // 通知自动配置相关的监听器
            this.fireAutoConfigurationImportEvents(configurations, exclusions);
            // 返回所有自动配置类
            return new AutoConfigurationEntry(configurations, exclusions);
        }
    }
我们主要看看是如何从配置文件读取的
getCandidateConfigurations
    protected List<String> getCandidateConfigurations(AnnotationMetadata metadata, AnnotationAttributes attributes) {
        // 这里就是关键,使用SpringFactoriesLoader加载所有配置类,是不是像我们SPI的ServicesLoader
        List<String> configurations = new ArrayList(SpringFactoriesLoader.loadFactoryNames(this.getSpringFactoriesLoaderFactoryClass(), this.getBeanClassLoader()));
        ImportCandidates.load(AutoConfiguration.class, this.getBeanClassLoader()).forEach(configurations::add);
        Assert.notEmpty(configurations, "No auto configuration classes found in META-INF/spring.factories nor in META-INF/spring/org.springframework.boot.autoconfigure.AutoConfiguration.imports. If you are using a custom packaging, make sure that file is correct.");
        return configurations;
    }
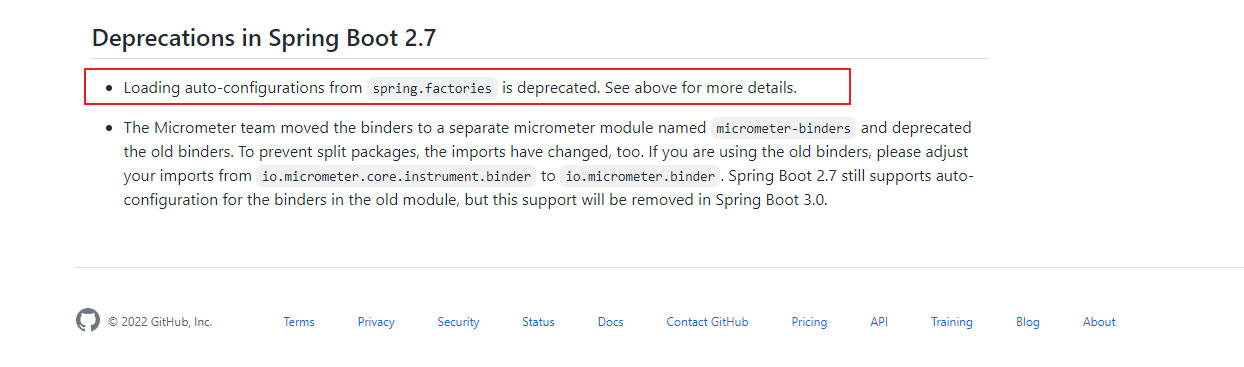
Spring Boot 2.7中,有一个不推荐使用的内容就是关于这个/META-INF/spring.factories文件的,因为在Spring Boot 3开始将移除对/META-INF/spring.factories的支持,目前2.7还是兼容的。
META-INF/spring/org.springframework.boot.autoconfigure.AutoConfiguration.imports
2.7之后只需要直接放配置类到这个文件就可以了
getSpringFactoriesLoaderFactoryClass
    protected Class<?> getSpringFactoriesLoaderFactoryClass() {
        return EnableAutoConfiguration.class;
    }
结合上一步,就是加载配置文件,并且读取key为EnableAutoConfiguration的配置
loadFactoryNames
    public static List<String> loadFactoryNames(Class<?> factoryType, @Nullable ClassLoader classLoader) {
        ClassLoader classLoaderToUse = classLoader;
        if (classLoader == null) {
            classLoaderToUse = SpringFactoriesLoader.class.getClassLoader();
        }

        String factoryTypeName = factoryType.getName();
        return (List)loadSpringFactories(classLoaderToUse).getOrDefault(factoryTypeName, Collections.emptyList());
    }
loadSpringFactories
    private static Map<String, List<String>> loadSpringFactories(ClassLoader classLoader) {
        Map<String, List<String>> result = (Map)cache.get(classLoader);
        if (result != null) {
            return result;
        } else {
            Map<String, List<String>> result = new HashMap();

            try {
    			// 这步就是意味中读取classpath下的META-INF/spring.factories文件
                Enumeration<URL> urls = classLoader.getResources("META-INF/spring.factories");

                while(urls.hasMoreElements()) {
                    URL url = (URL)urls.nextElement();
                    UrlResource resource = new UrlResource(url);
                    Properties properties = PropertiesLoaderUtils.loadProperties(resource);
                    Iterator var6 = properties.entrySet().iterator();

                    while(var6.hasNext()) {
                        Map.Entry<?, ?> entry = (Map.Entry)var6.next();
                        String factoryTypeName = ((String)entry.getKey()).trim();
                        String[] factoryImplementationNames = StringUtils.commaDelimitedListToStringArray((String)entry.getValue());
                        String[] var10 = factoryImplementationNames;
                        int var11 = factoryImplementationNames.length;
    					// 接下来就是读取出文件内容,封装成map的操作了
                        for(int var12 = 0; var12 < var11; ++var12) {
                            String factoryImplementationName = var10[var12];
                            ((List)result.computeIfAbsent(factoryTypeName, (key) -> {
                                return new ArrayList();
                            })).add(factoryImplementationName.trim());
                        }
                    }
                }
				// 过滤
                result.replaceAll((factoryType, implementations) -> {
                    return (List)implementations.stream().distinct().collect(Collectors.collectingAndThen(Collectors.toList(), Collections::unmodifiableList));
                });
                cache.put(classLoader, result);
                return result;
            } catch (IOException var14) {
                throw new IllegalArgumentException("Unable to load factories from location [META-INF/spring.factories]", var14);
            }
        }
    }
OVER ,后面的逻辑其实挺复杂的,展开了说就太多啦。感兴趣的可以自己去探索。
本篇介绍了关于SpringBoot的自动装配原理,我们先通过SPI机制进行了小小的热身,然后再根据SPI的机制进行推导Spring的自动装配原理,中间还带大家回顾了一下@Import注解的使用